Slow Down the Action With Optical Flow in Final Cut Pro X

It’s easy to slow down time using Optical Flow in Final Cut Pro X. Master the technique with FREE stock footage and music from Shutterstock and PremiumBeat.
One of our favorite video editing tools is Optical Flow in Final Cut Pro X. This feature, similar to the popular Twixtor plugin, allows users to slow down clips in a way that simulates footage shot at a high frame rate.
Optical Flow is a great creative tool for showcasing your film and video projects in a unique way. The following video tutorial will demonstrate how to use creatively use Optical Flow in Final Cut Pro X.
But don’t just watch the clip… fire up Final Cut Pro X and discover what it’s like to manipulate time with Optical Flow! We’ve teamed up with Shutterstock to give you free assets so you can follow along.
You can download the free footage, sound effects, and assets from the Final Cut Pro X page here on PremiumBeat.
Download Free Optical Flow Assets
https://vimeo.com/162968170/6f3b2ad131
Using Optical Flow in Final Cut Pro X
Step 1: Select the Clip in the Timeline

First, select your clip in the timeline. This will tell Final Cut Pro X which clip to apply the speed changes to.
Step 2: Change the Speed

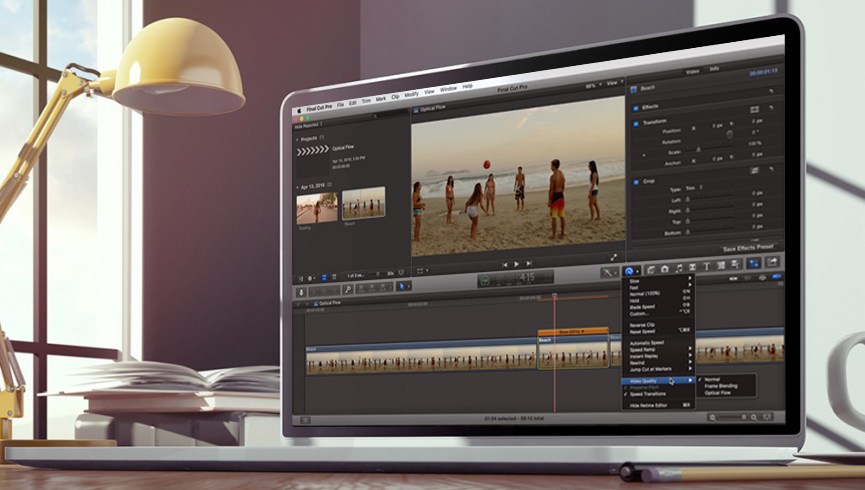
To change the speed of your clip, click on the small icon that looks like a speed gauge in the top right corner of your timeline. Once you click on the button, navigate to Slow and click your desired speed.
Step 3: Apply Optical Flow

By default, Final Cut Pro slows down your footage using a Normal frame-stretching process. This leads to jittery footage and isn’t ideal in a professional context. To slow down your footage using Optical Flow, navigate to the gauge icon and select Video Quality > Optical Flow.
Optical Flow is not instantaneous. It will take a little time for Optical Flow to render. To see the progress of your render, look for the small % indicator below your program monitor.
Step 4: Adjust as Needed

You can change the duration of your slow motion footage by clicking the icon in the top right corner of your footage. Using this tool, you can slow down your footage to whatever speed you want.
Want a deeper dive into editing your FCPX video? Check out this video tutorial.
What’s your favorite way to utilize Optical Flow in Final Cut Pro? Share your advice in the comments below.